| IGES
import - Architectural modelling - Texturing
Part 3
PREPARING THE IGES FILES
Lets just discuss briefly what we did to
"prepare" these files before exporting
them to RS3D:
Q: Why not simply export the
whole architectural documentation into RS3D
?
A: Because most CAD documentation
contains "extraneous" information
- in the form of dimensions, text labels,
hatching, and redundant linework. If we
imported such a file - not only would it
be terribly complex - but we would have
to create all our "3D" elements
from scratch by "tracing" the
plans.
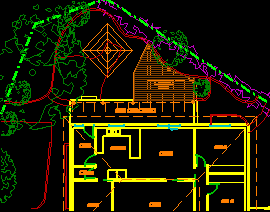
Typical CAD documentation - we need to
simplify CAD files before exporting.
Rather than heading down that path - we
can skip a lot of the tedium of creating
the walls and roof etc. by creating simple
Polylines in the CAD package before exporting.
We can reference in the architectural documentation
in, and simply trace the walls with a SINGLE
polyline. We need these lines to be closed.
When these lines are imported into RS3D,
we simply give them a height and our 3D
geometry is created !
Most of the modeling can essentially be
created in the CAD package - by placing
simple blocks where windows are, we can
Boolean out these from the walls to create
the window holes. Put linework at its correct
heights in the CAD package too - the more
we do in CAD the less fiddling we have in
RS3D.
TIPS:
IGES exporting works from a variety of
packages - not exclusive to CAD. Microstation
exports IGES natively, AutoCAD does not.
3D packages such as Maya import very well,
with object structure maintained. IGES file
format is very flexible as it imports NURB
geometry as well. Basic formats such as
DXF do not.
IGES uses color information to derive object
levels, not CAD levels. Hence, structure
your files based on color - be aware however
that one can only utilize the 8 primary
colors. (A dark red color object will simply
be put in the Red color level in RS3D)
It is often very useful to import the building
in stages rather than one file - this gives
you flexibility with level structures, and
file import type.
RS3D can import IGES files as Polyhedrons,
SDS objects or Nurb curves. This only applies
for curves themselves - 3D nurb surfaces
will always import as just that. A series
of curves however can be imported as one
SDS object - from which you can build faces,
by snapping to the points, to create complex
polygon roofs for example - or bring each
curve in as individual NURBs curves. Polyhedrons
are the most useful for Architectural applications
as they are low in complexity and Boolean
very well.
Keep in mind that most 3D architectural
models become VERY heavy very quickly. Therefore
keeping objects in a readable level structure
format is imperative. e.g.. Group walls
under a "Walls" level, then drop
that level under the "house" level,
then put the house level under the "Buildings"
level etc.
When importing large CAD scale documents,
its preferable to keep the units from the
CAD file, as most CAD documentation is 1:1
- i.e.. 1mm = 1mm. (Note - most documentation
is in mm [in metric]) this can create dimensionally
large files in RS3D. We can scale the drawing
files on import - but its best to leave
the scale tab at 1. The drawback of this,
is files can be off the "design plane",
or too large for RS3D altogether. One can
check the "Center model" option
- but keep in mind that this will not necessarily
import further files in the correct location.
* Note: The IGES
plugin for Realsoft
3D does not come built in - it is
an aftermarket plugin developed by a third
party.
|